Introduction
Databricks Asset Bundles are a tool to facilitate the adoption of software engineering best practices, including source control, code review, testing, and continuous integration and delivery (CI/CD) for your data and AI projects. Bundles make it possible to describe Databricks resources such as jobs, pipelines, and notebooks as source files. These source files provide an end-to-end definition of a project, including how it should be structured, tested, and deployed, which makes it easier to collaborate on projects during active development.
The main goal of Asset Bundles is the automated deployment of artifacts to the different stages in Dev, Int, and Prod, as can be seen in the following sketch:
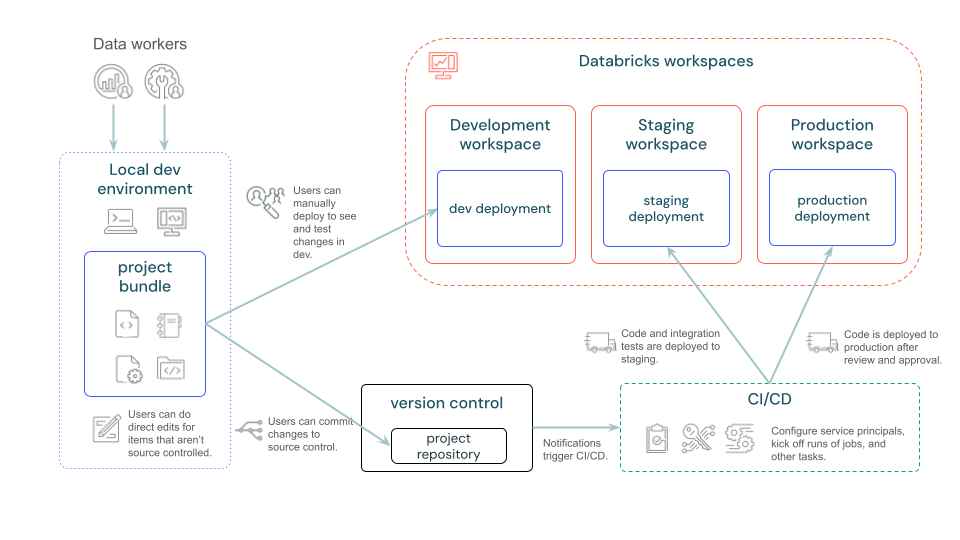
Further information can be found in the official Databricks documentation: https://docs.databricks.com/dev-tools/bundles/index.html
It also mentions when you should use asset bundles: https://docs.databricks.com/en/dev-tools/bundles/index.html#when-should-i-use-databricks-asset-bundles
However, this article does not cover the asset bundles themselves; rather, it focuses on how to create a corresponding Azure DevOps pipeline.
Preparation
Various preparations are required to ensure that the setup can be started seamlessly.
Databricks CLI
To work with Databricks Asset Bundles, we need a Databricks CLI. This is easy to install; Databricks has written detailed instructions here. The documentation can be found on the official Databricks documentation. I have made a habit of using the documentation that corresponds to my Databricks platform, namely Azure Databricks: https://learn.microsoft.com/en-us/azure/databricks/dev-tools/cli/. There are also versions for Databricks on AWS and GCP.
The documentation also describes in detail how to install the Databricks CLI: https://learn.microsoft.com/en-us/azure/databricks/dev-tools/cli/install If you’re lucky enough to own a Mac, it’s very easy, especially with homebrew. 😊
Authentication with Databricks CLI is another topic to which I have already dedicated an entire blog post. You can find this blog here: Authentication Methods with Databricks CLI on Azure Databricks - Step by Step
IDE for developing Code
A suitable IDe should be installed on the development machine so that the code artifacts can be developed. Here, either Visual Studio Code or PyCharm can be used.
Git Installation on a Desktop Machine
We also need git installed on the Developer machine to push changes into the repo.
Azure Infrastructure
Of course, the corresponding infrastructure must already be in place. Ideally, this is also deployed automatically with IaC and automated DevOps pipelines. In my example, I have created a sample setup with three environments: Dev, Int, and Prd.

Azure DevOps Project
If an Azure DevOps project does not already exist, one must be created. https://dev.azure.com
You need proper rights on the Azure DevOps project. For example, the right to create pipelines and Service Connections.
Set up the DevOps Project
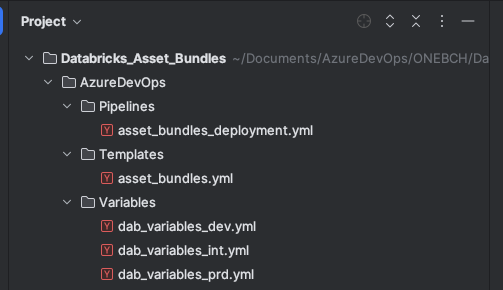
First, we create a new Azure DevOps project and give it a descriptive name. A repository is also automatically created within the project. I clone this repo locally and then create a local folder structure. You can either create this structure yourself or clone an example project. I have attached the address of the example project at the end of this article. The folder structure should look like this:

The “AzureDevOps” folder contains all artifacts for the DevOps pipeline, including pipelines, templates, and variables:
The “Databricks” folder contains all Databricks artifacts, such as jobs, notebooks, wheels, etc. In this simplified example, we will only deploy notebooks.
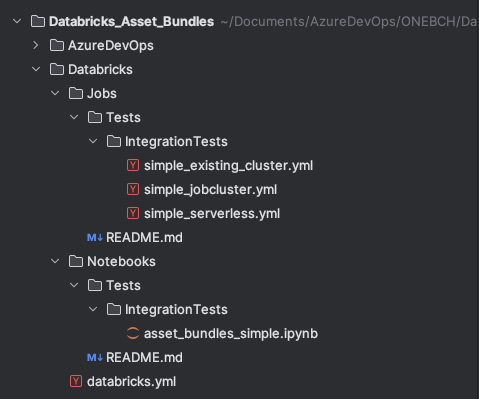
The Docs folder also contains a few Markdown files for the documentation. Of course, the folder structure can be individually adapted to your own needs.
Databricks CLI
After I have installed the Databricks CLI, I check the version:
|
|
The following output should then appear:

In my example, I have installed the latest version of the Databricks CLI, which is available on 08.01.2025. It is advisable to update the Databricks CLI regularly, as new features are developed on a regular basis.
Theoretically, I could create a new Asset Bundles project with the CLI:
|
|
But I won’t do that now.
Databricks asset bundle definition
The configuration and definition of the asset bundles are carried out in the “databricks.yml” file. This file is located in the “Databricks” folder. The content of this file is as follows:
|
|
The content of this file is a minimal example configuration, which can be extended as required. A brief explanation:
In line 5, I assign the name of the bundle_ “dab01”.
In line 7, I define which directories contain the job definitions and list the relative paths. Instead of throwing everything into one directory, I have created a nested structure, hence the relative paths 3 times.
The definition of the target then follows on line 12. I have three stages Dev, Int and Prd. I describe these three stages here. Firstly, I specify the host addresses, as each stage has a different address. I also specify the mode, whether it is development or production. With development, the artifacts are automatically deployed to a user directory, and all triggers are stopped. For Int and Prd, I set the mode to production, and in addition to the host, I specify the root path where the artifacts are to be deployed. In my example, a folder with the bundle name is to be created directly in the root of the Databricks workspace. I also specify the ID of a service principal with which the jobs are to be executed. As I am only creating this whole setup for test purposes, I added a preset that the triggers in Int and Prd should be paused. That’s actually all the magic for deploying asset bundles. Of course, you can extend this definition much further and adapt it to your own needs.
To test the setup, I will perform a validation. To do this, however, I first have to log in to the workspace. To do this, I enter the host address and tell it to do this for the profile dev:
|
|
A browser window opens in which you have to authenticate yourself, and then a success message appears:

On the console, you can see that the “dev” profile has been created:

Now I can validate the asset bundle definition:
|
|
Ideally, the following success message appears:

You can, of course, deploy the whole thing to the dev environment manually. Here, I specify the target and the profile to be used:
|
|
And this message appears:

In the workspace, I can see that a new folder has been created. This is located in the user’s home directory.

In my example project, I have created three simple jobs:

These jobs have now been deployed accordingly in the dev workspace:

What is striking here is that a prefix is created for the corresponding job names. The reason for this is that several developers can develop the same jobs in the same workspace at the same time without getting in each other’s way.
It is also possible to start a job with asset bundles. In my example setup, I have a job called “simple_serverless,” which I can start with the following command:
|
|
While the job is running, the terminal is blocked:

And you can see the run in the workspace:

A success message is then also displayed on the terminal:

Of course, the aim now is not to deploy and start the jobs manually on Int and Prd but to do the whole thing automatically with a DevOps pipeline. We will look at this in the next chapters.
Service Principals
Automatic deployment could now be done with service principals or managed identities. This means that deployment is not carried out via a user account but, as mentioned, via the technical accounts. In my example, I implement this with three service principals. I use a separate service principal for each environment, one for Dev, Int, and Prd.
When assigning names, it makes sense that the respective names of the service principals are descriptive. This is their name in my example:
- DAB_Srv_DevOps_Dev
- DAB_Srv_DevOps_Int
- DAB_Srv_DevOps_Prd
There are detailed instructions for Azure on how to create a service principal: https://learn.microsoft.com/en-us/power-apps/developer/data-platform/walkthrough-register-app-azure-active-directory
In the Azure Portal, you can search for app registrations and then create a new one. I choose a descriptive name so that you can roughly recognize the purpose for which this service principal was created.
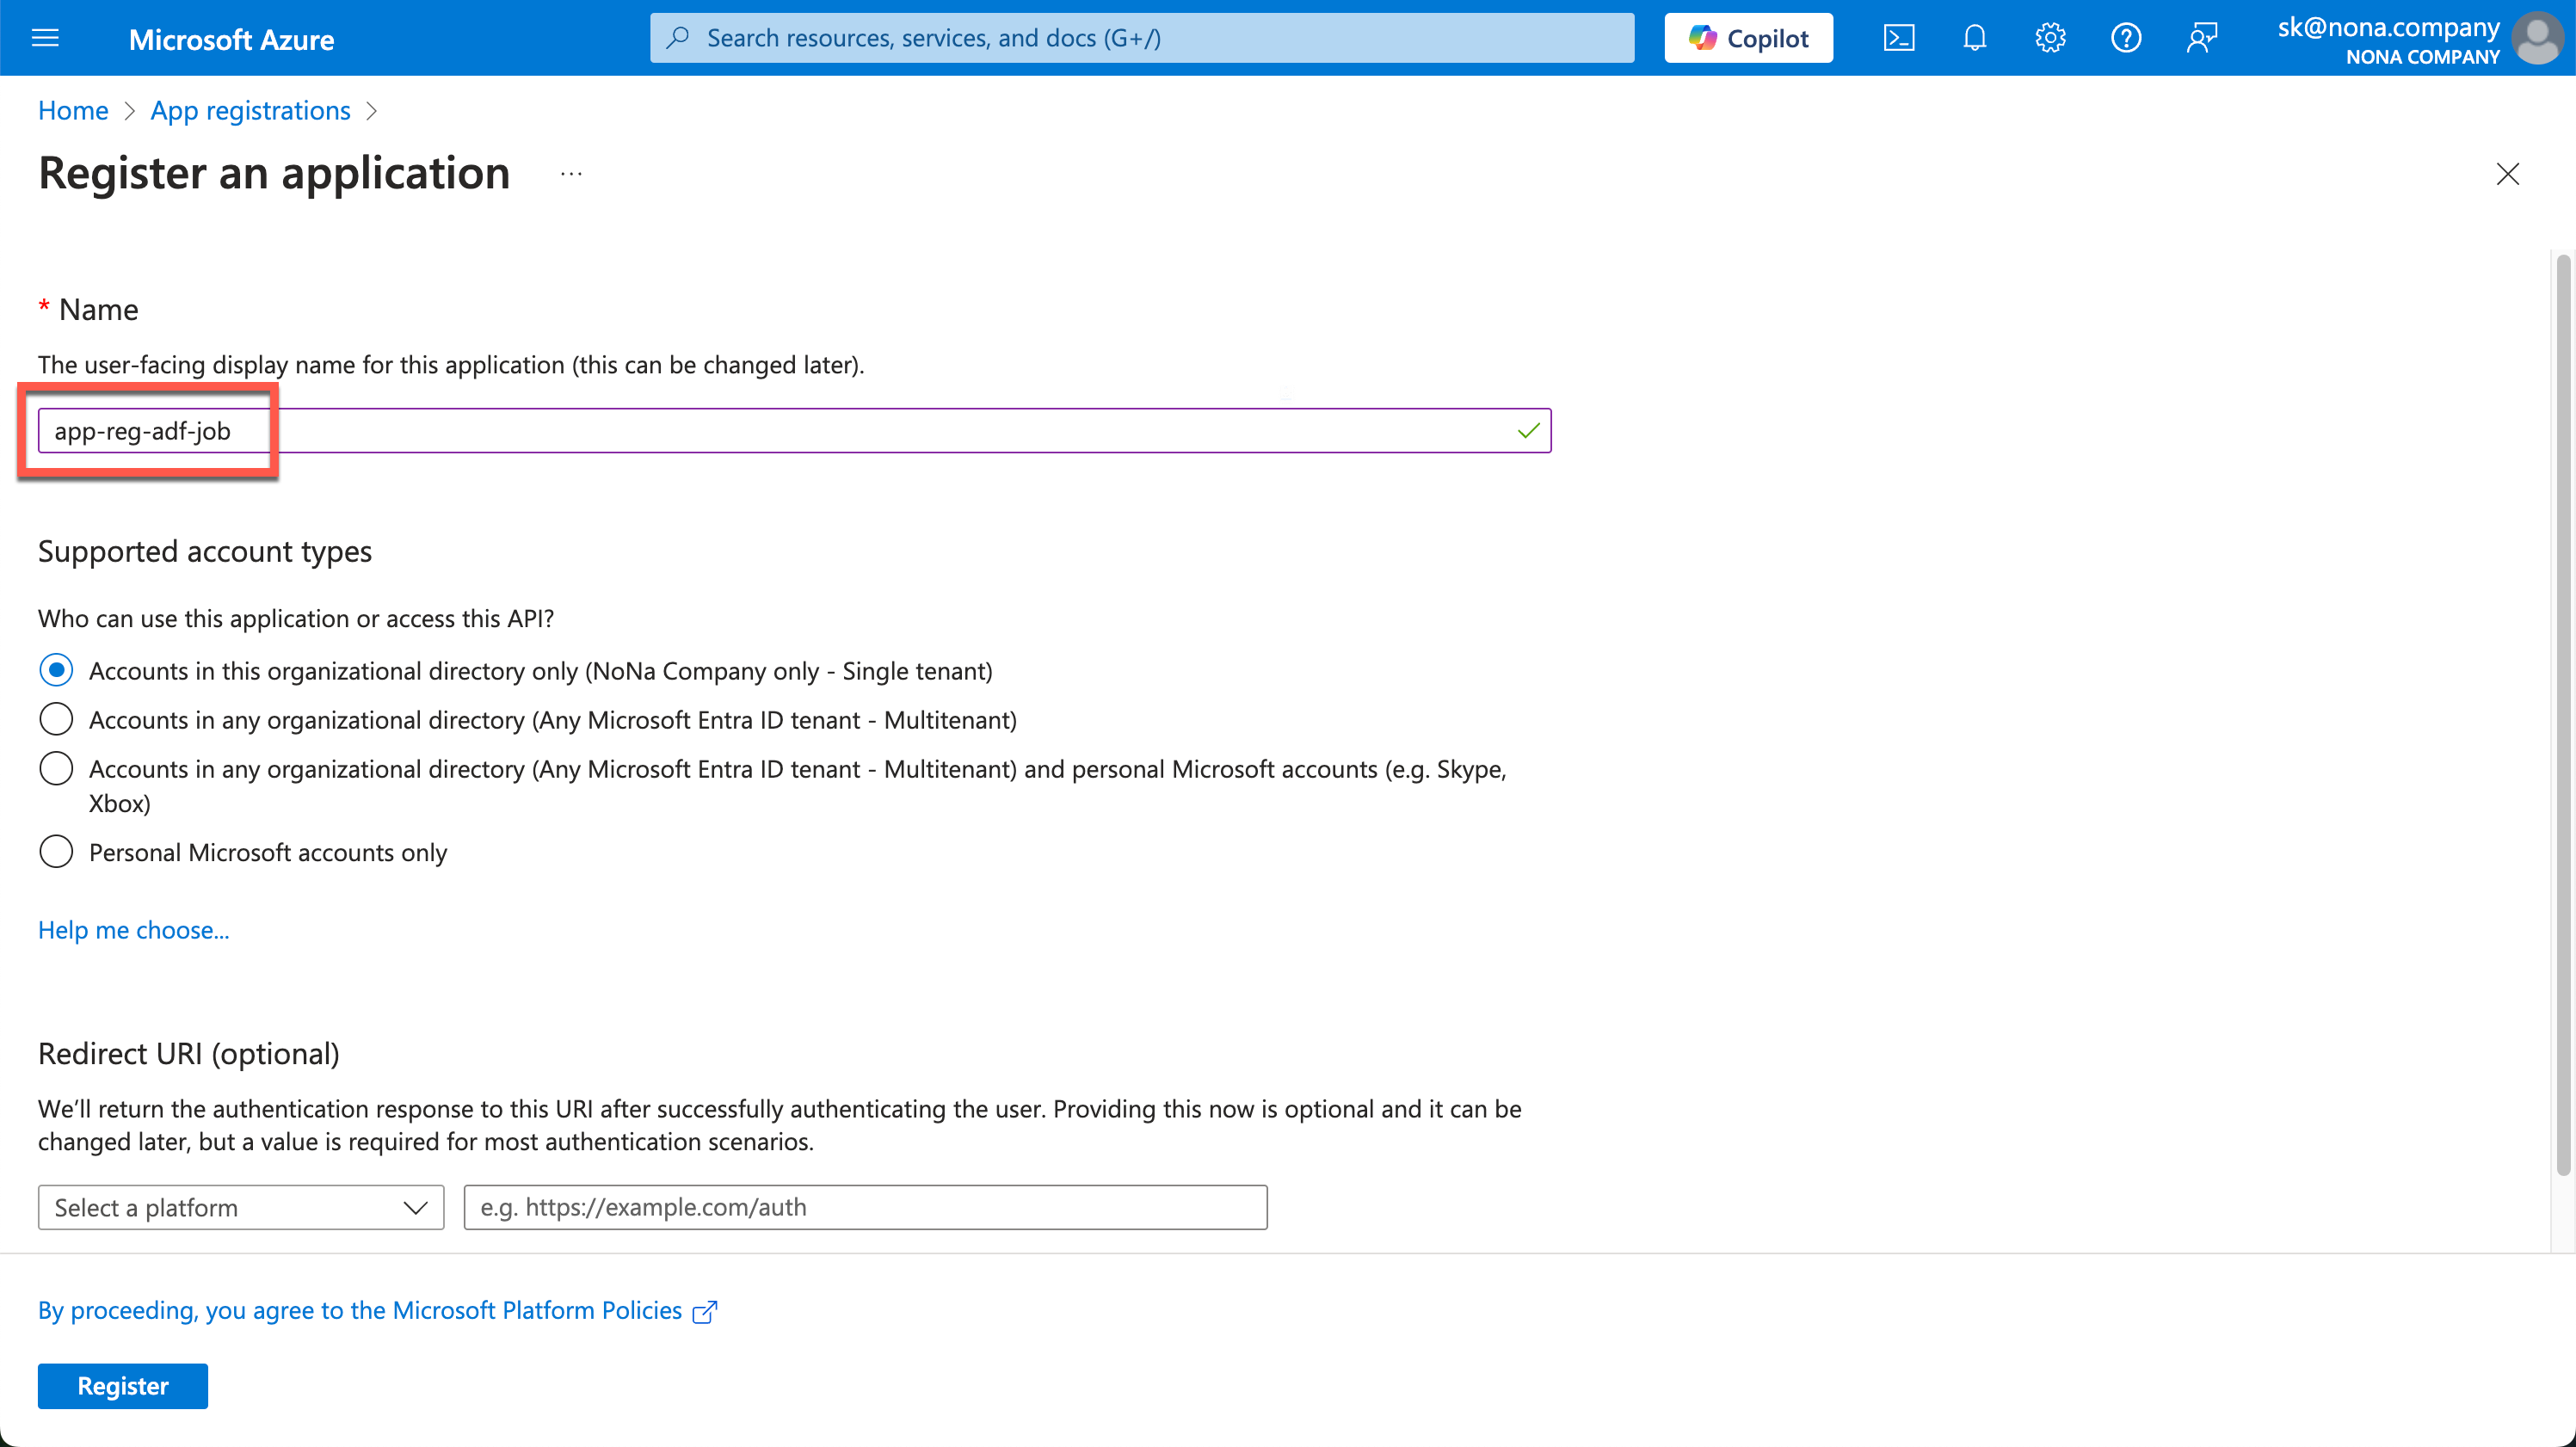
You can leave the Redirect URI empty.
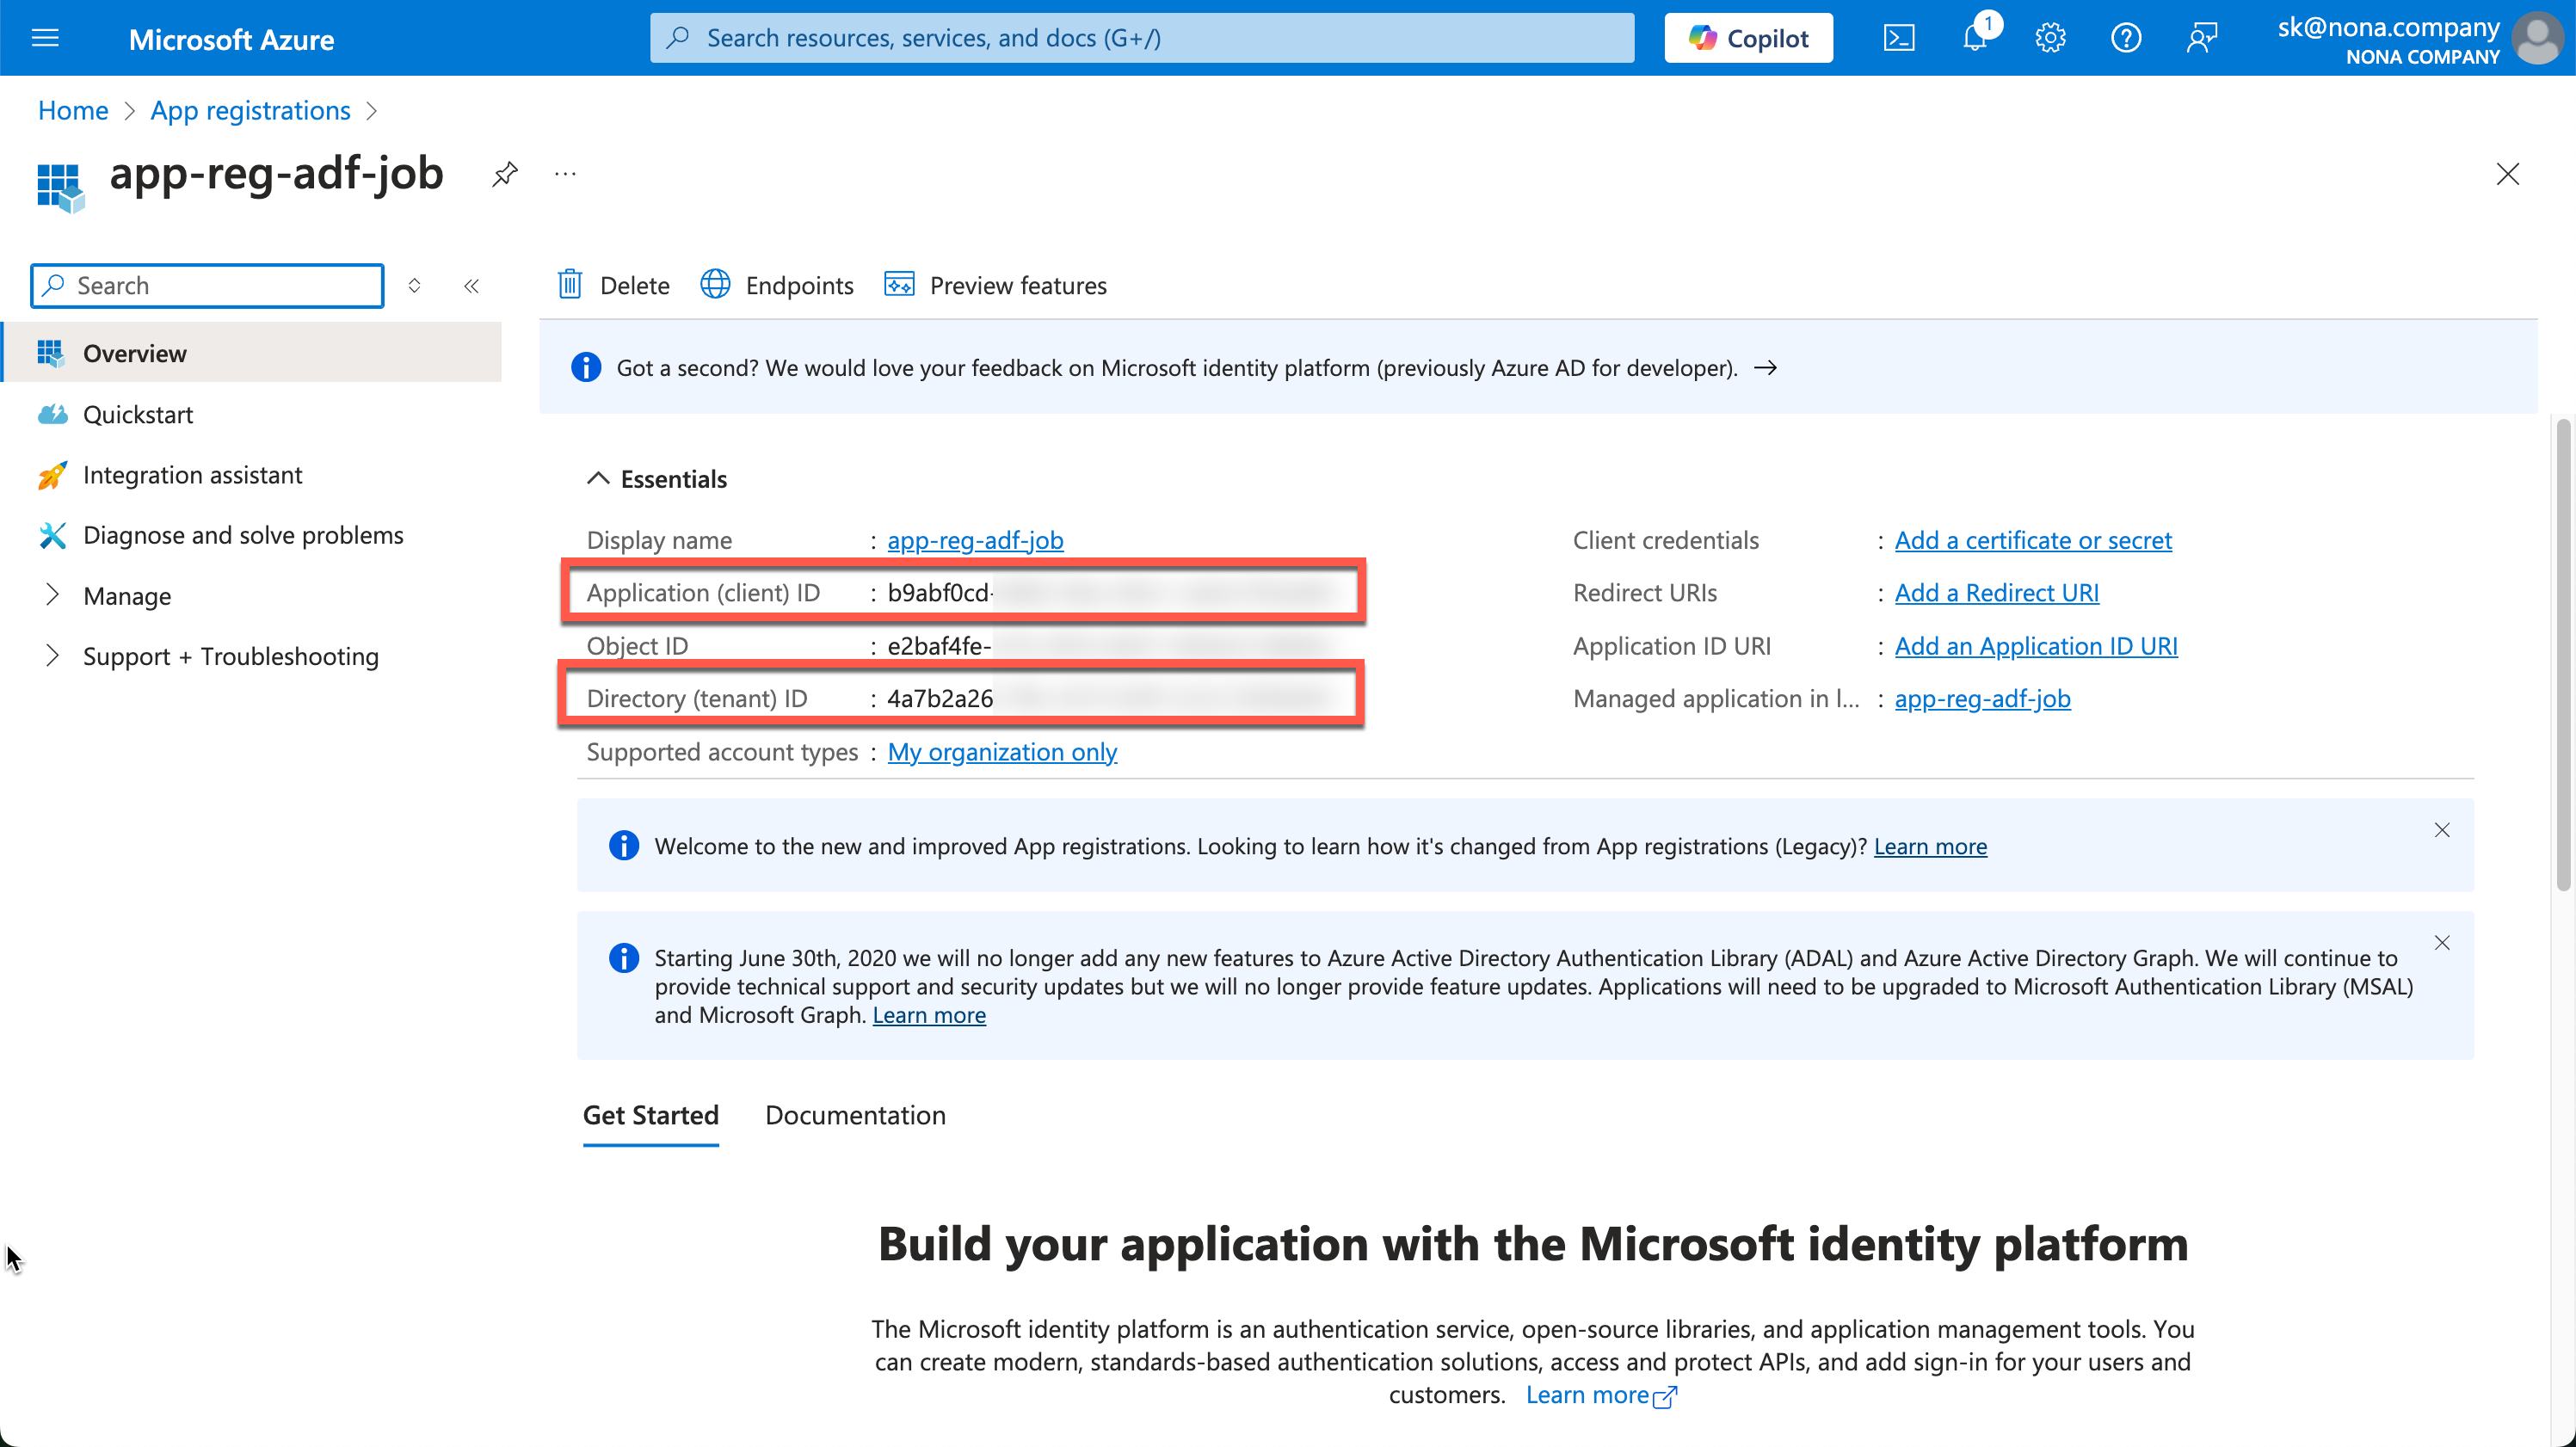
After creating it, you will see the important information in the Overview. We need the Application (client) ID and the Directory (tenant) ID.
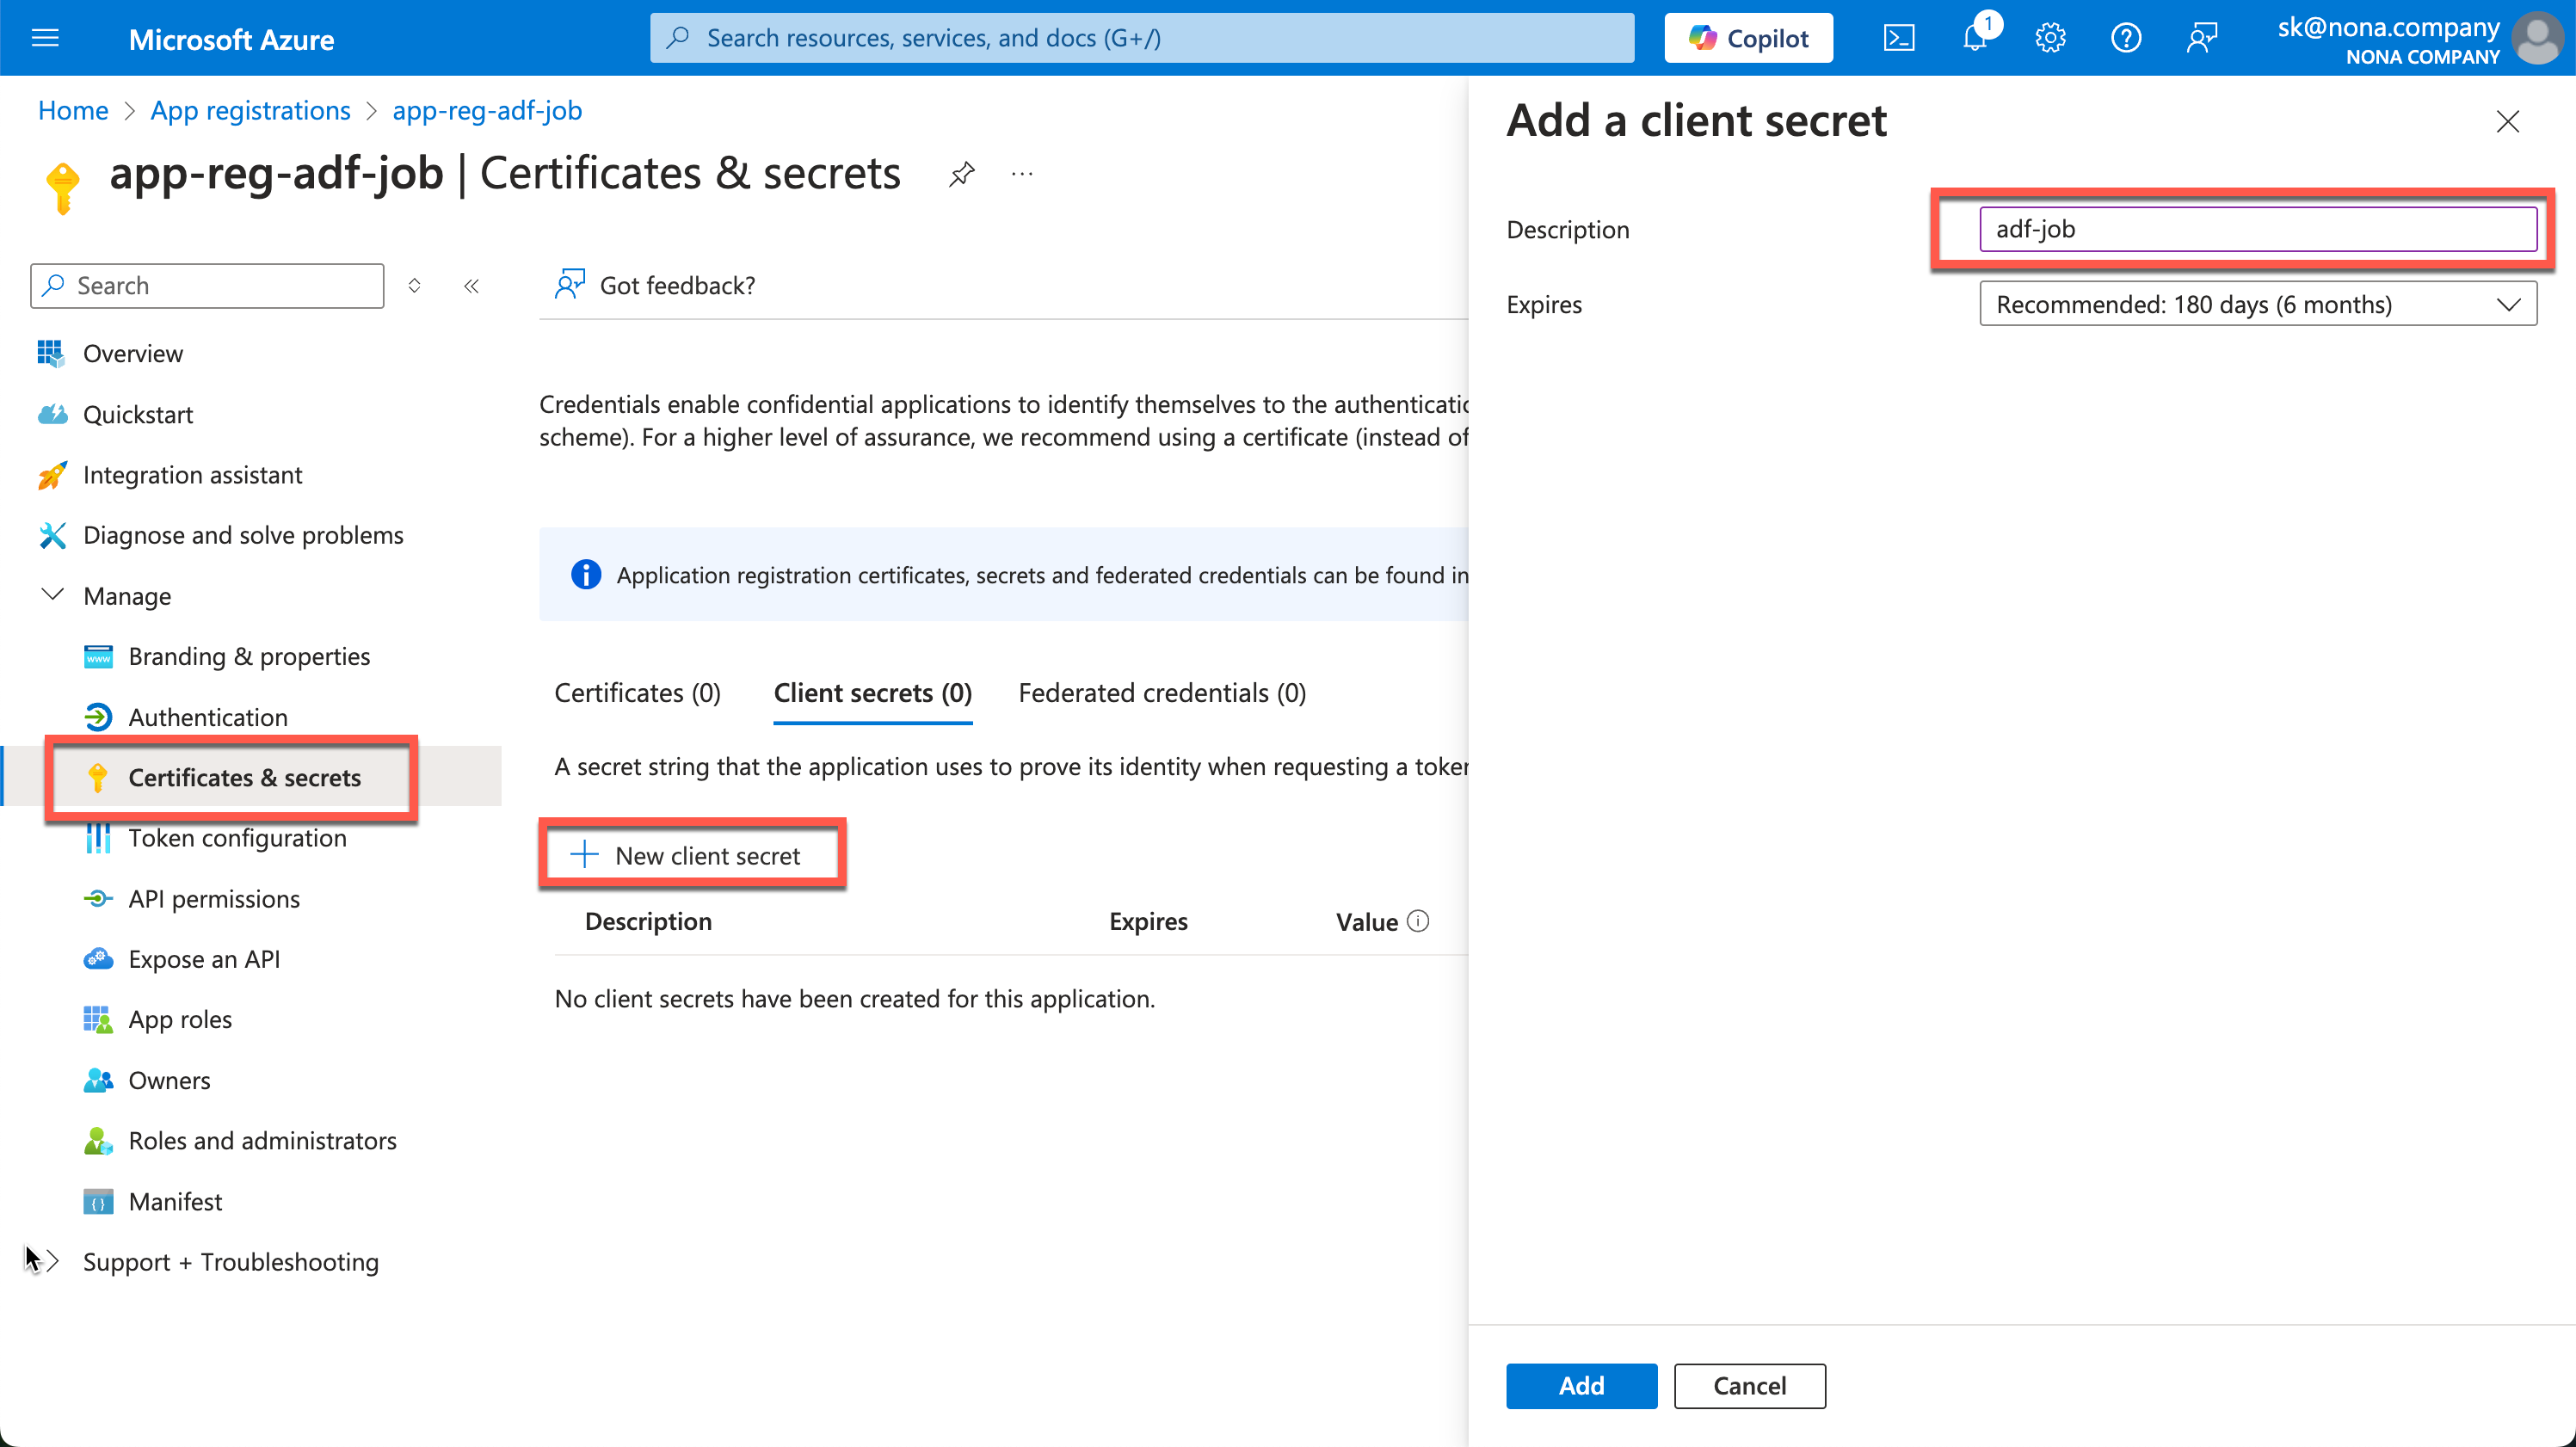
Now we need a secret, which we can create under “Certificates & secrets.”
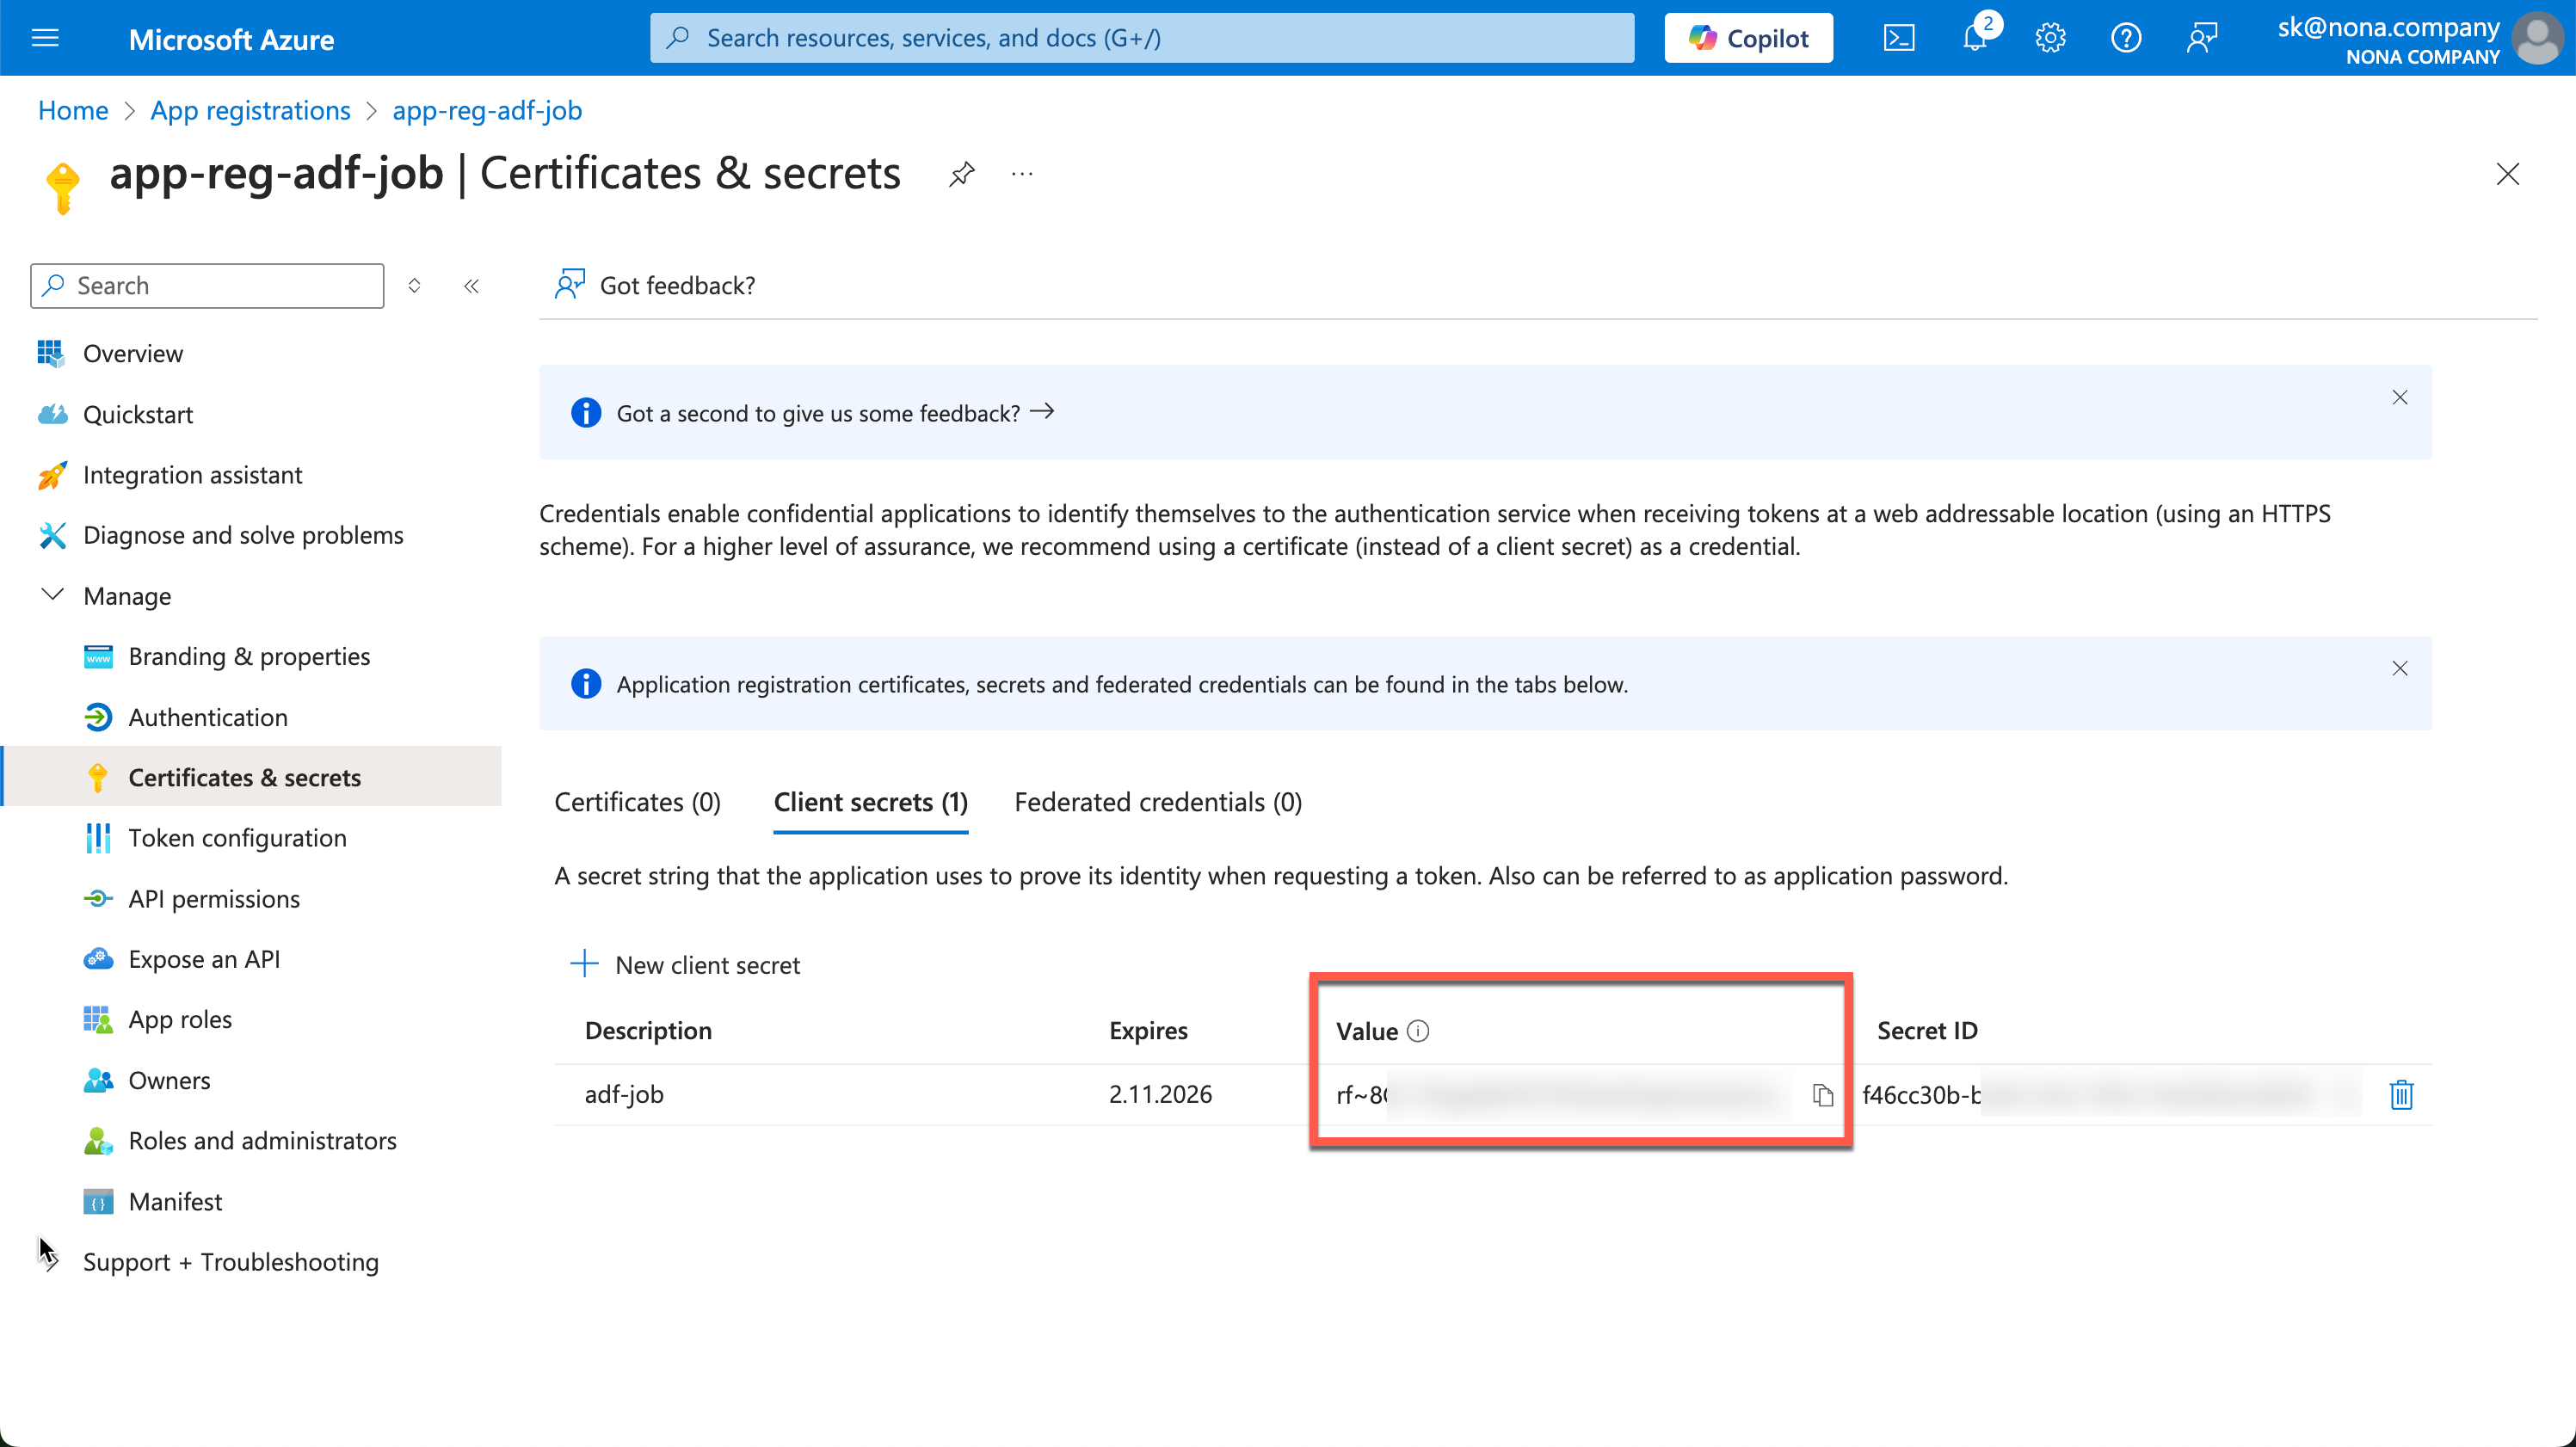
The created secret is then displayed in the value field. This process is only possible once, so the secret must be copied out immediately and saved in a safe place. The best place to save is, for example, an Azure KeyVault.
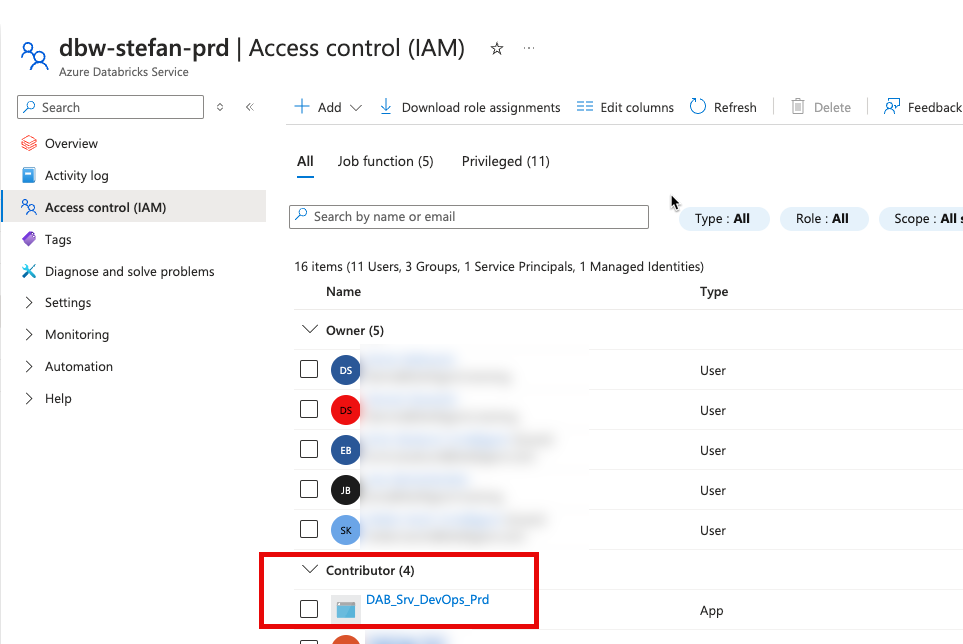
The Service Principals need a Contributor Role on the Databricks Workspace Resource. If possible, assign this authorization automatically during a Terraform deployment.
Service Connections
Service connections must be created so that Azure DevOps can execute the pipelines against the corresponding resources. These must be configured in the DevOps project. These can be set by switching to the settings in the project and then clicking on the “Service connections” tab. In my example, you can already see the three connections.
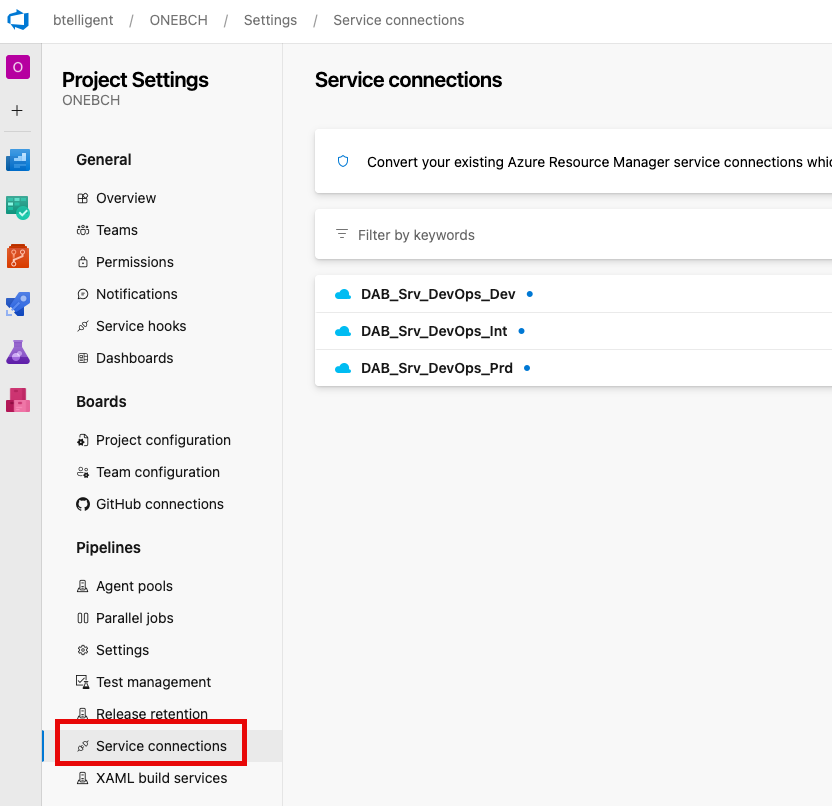
To create a new connection, you can click on the corresponding button at the top right:

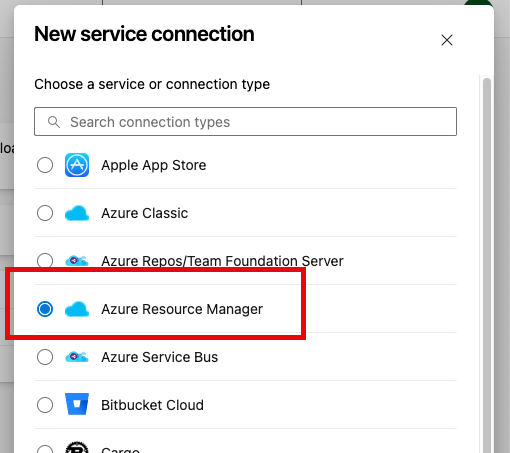
For the connection type, I select “Azure Resource Manager.”
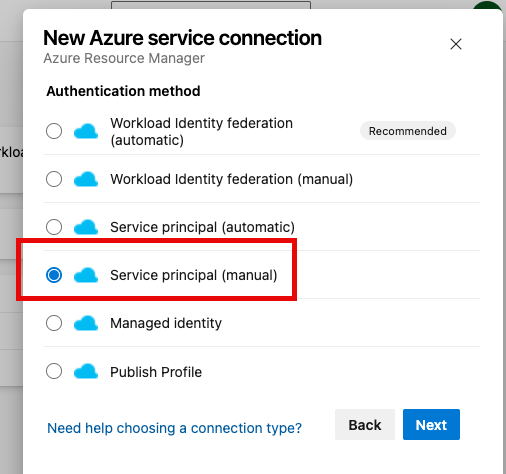
For the authentication method, use “Service Principal (manual).”
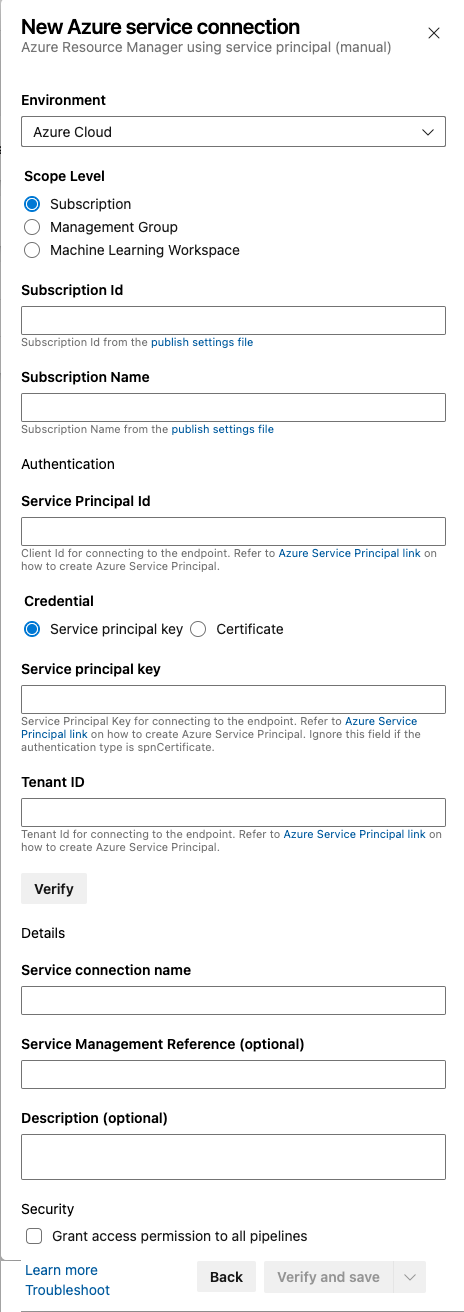
The information can then be entered in the settings. I repeat this step for all three environments.
Assign Service Principal Databricks Workspace Access
The Service Principals should be assigned the Databricks Workspace Administrator role. For this, assign the Srv Principals to the Workspace and the roles.
Go to the setting in the top right corner and follow the steps.
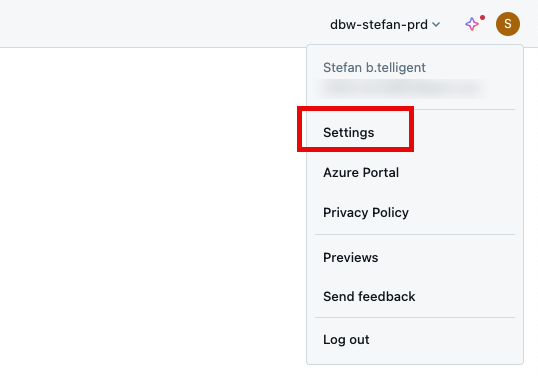
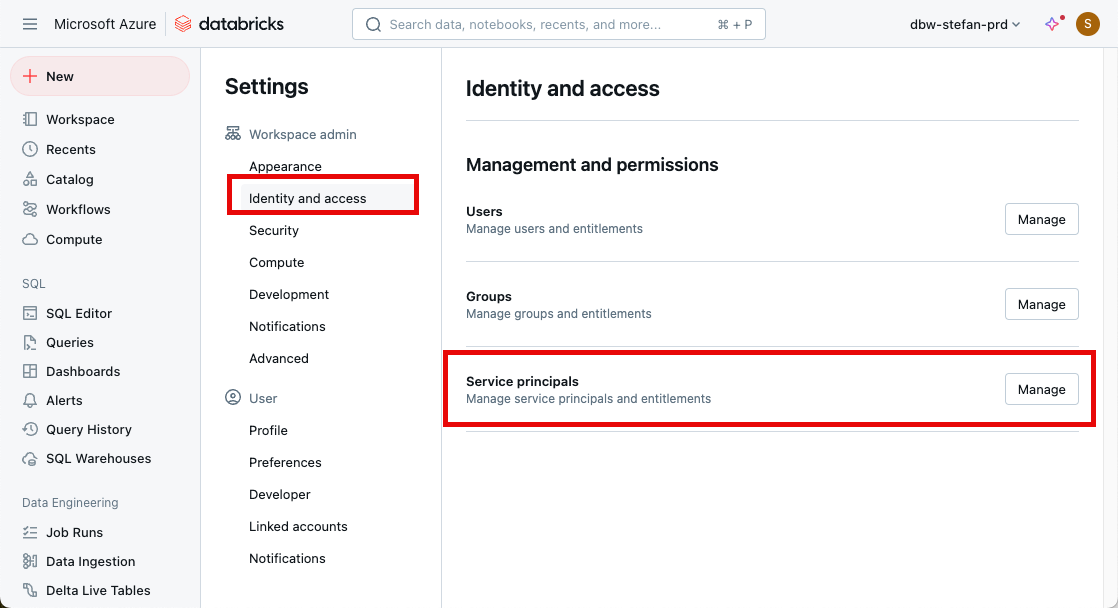
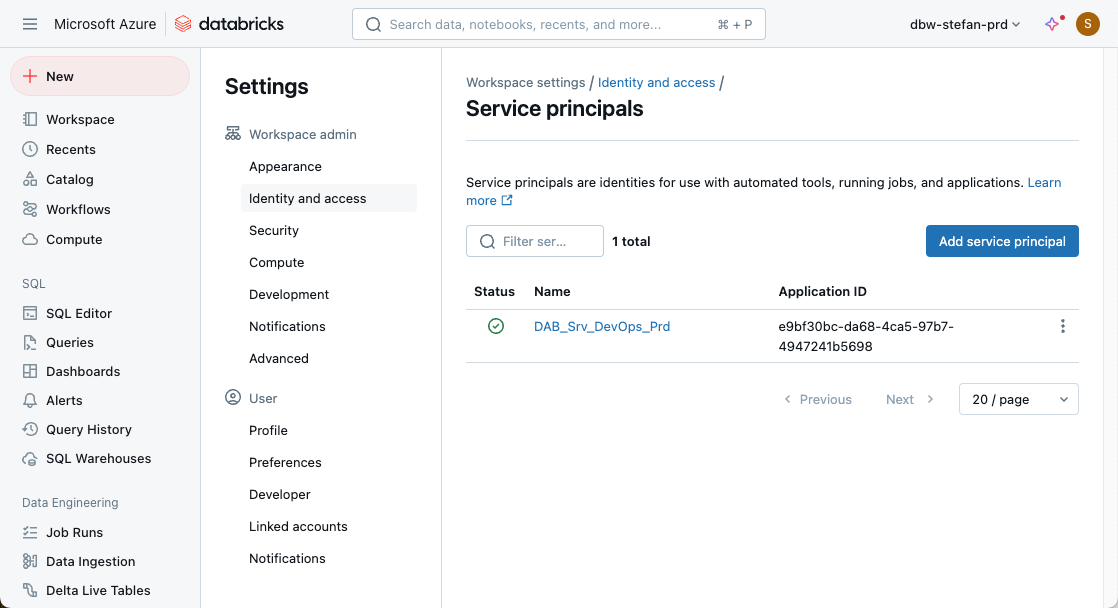
The Service Principal should be added to the workspace.
Then go to groups, admin, and add the service principal to the group:
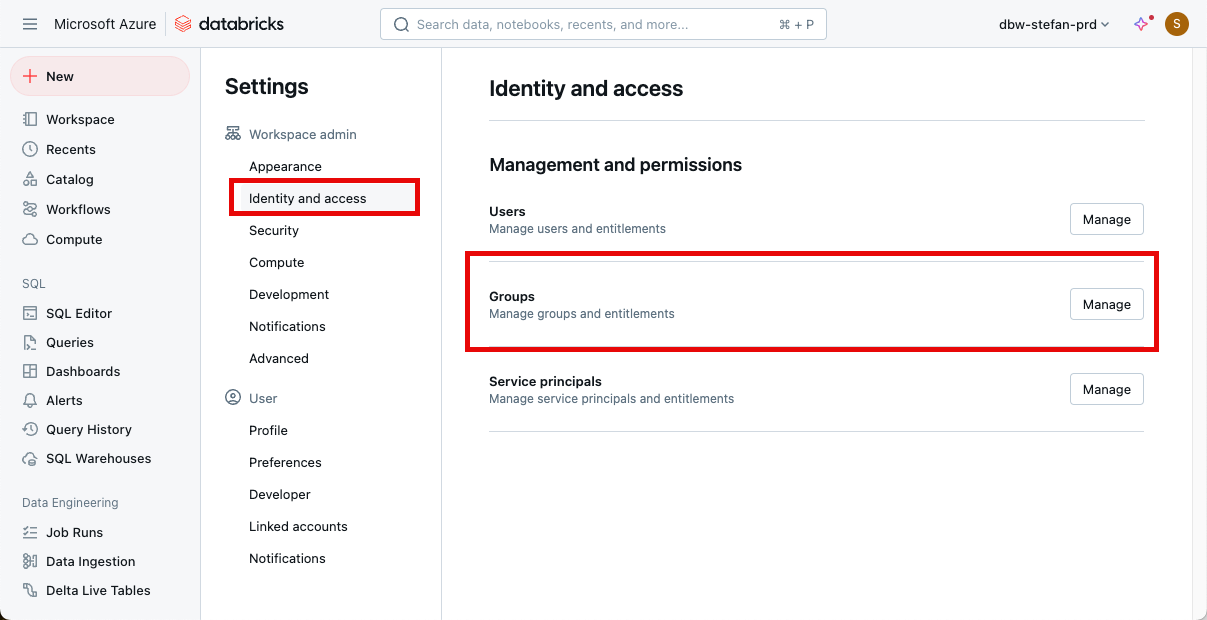
Add the Service Principal as a member of the admin group.
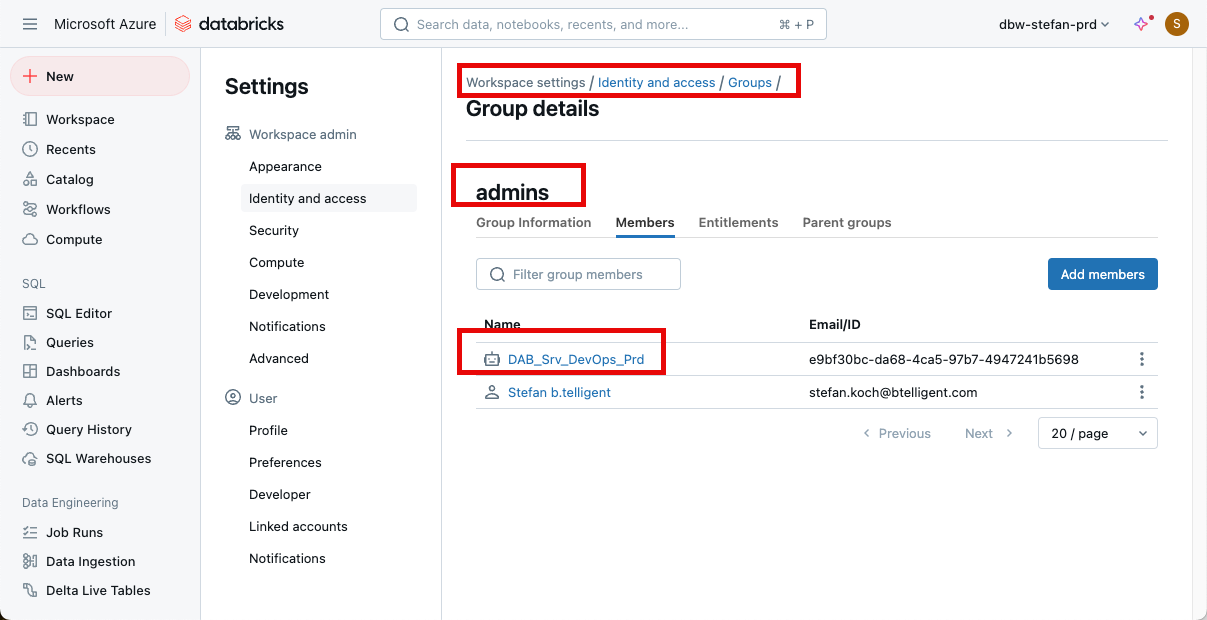
Again, the step must be repeated for all three environments.
Azure DevOps Pipeline Definition
Now, we come to the core topic of the article: the DevOps pipelines. We have an AzureDevOps folder in the repo, which contains various files. In the “Variables” subfolder, I have created one variable file for each environment:
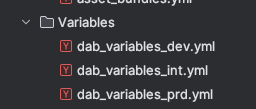
The content of the file is as follows:
|
|
These files can, of course, be extended as required.
I also have a “Templates” folder, which contains a file:

We will look at the template content below. The file starts with a few basic parameters:
|
|
The environment, the service connection, and an action. When we call the main pipeline, we can specify an action parameter, and only that action will be executed. In this way, we can avoid redundancies in the code.
This is followed by the definition of the jobs or the individual steps.
|
|
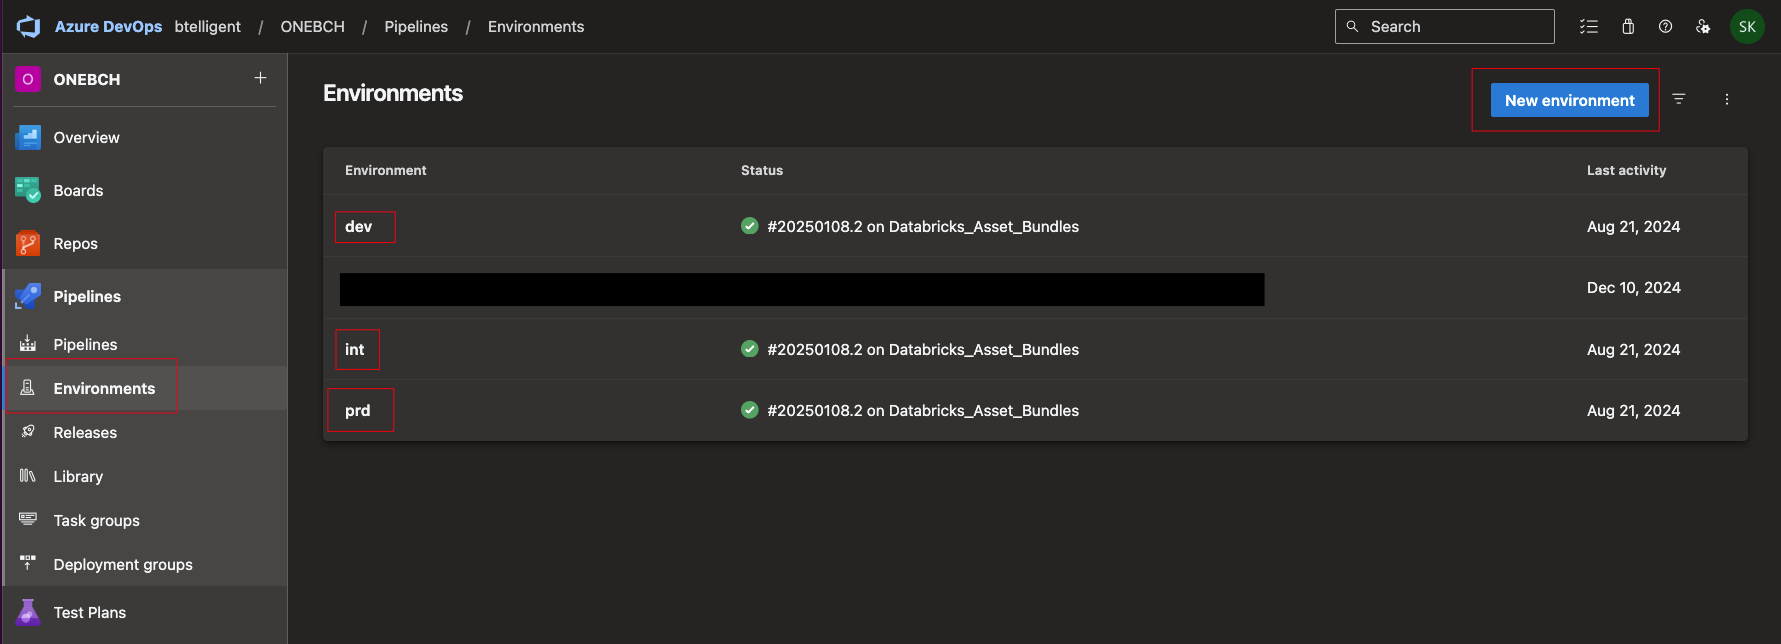
Important here, we have defined an environment. Since we want to separate the deployment of the stages, we also want to work with environments in Azure DevOps. Environments can be created in the corresponding tab in Azure DevOps. I name the environments in Azure DevOps the same way I name the stages.
The first step is to check out the code.
|
|
I then install the Databricks CLI.
|
|
As a little bonus, I output the version of the Databricks CLI on the console, which then flows into the log so I can see which version was deployed afterward.
|
|
Now comes the trickiest part of the pipeline: the authentication. I racked my brain for some time until I was finally able to solve this step:
|
|
After we have authenticated ourselves, I validate the asset bundle.
|
|
The part with the action follows. No matter which action I execute, the aforementioned steps must always be performed. However, the subsequent steps are only executed if the corresponding action parameter also matches. Deploy from DAB:
|
|
Fancy an automated run of a job? No problem:
|
|
Clean up the DABs again? Of course:
|
|
And now to the actual deployment pipeline. I start with a trigger. The trigger can be chosen at will, for example, as a dependency on a branch for a pull request or another event. In this small example, I have decided not to implement a trigger. You can, of course, adapt this as you wish.
|
|
The next part is the deployment to Dev:
|
|
I use the template mentioned above and pass “deploy” as the action parameter and the corresponding variable file. After the deployment in the dev, I would now like to start a job automatically.
|
|
At the moment, I have hard-coded the job using the template. This could also be done dynamically. It is also noticeable that I have stored a dependency with “dependsOn”. This allows you to control the individual steps within the pipeline. First, A must be completed before B can start, and so on.
Now, we can tackle the deployment according to Int and Prd:
|
|
I have added a clean-up as the last step. However, this does not have to be executed as the last step in the pipeline; it can already start after the test job has run successfully.
|
|
Once I have configured all the files accordingly, I can commit the code and push it to Azure DevOps.
Creating the Azure DevOps Pipeline
When you log in to Azure DevOps, go to the Pipelines tab and create a new one:
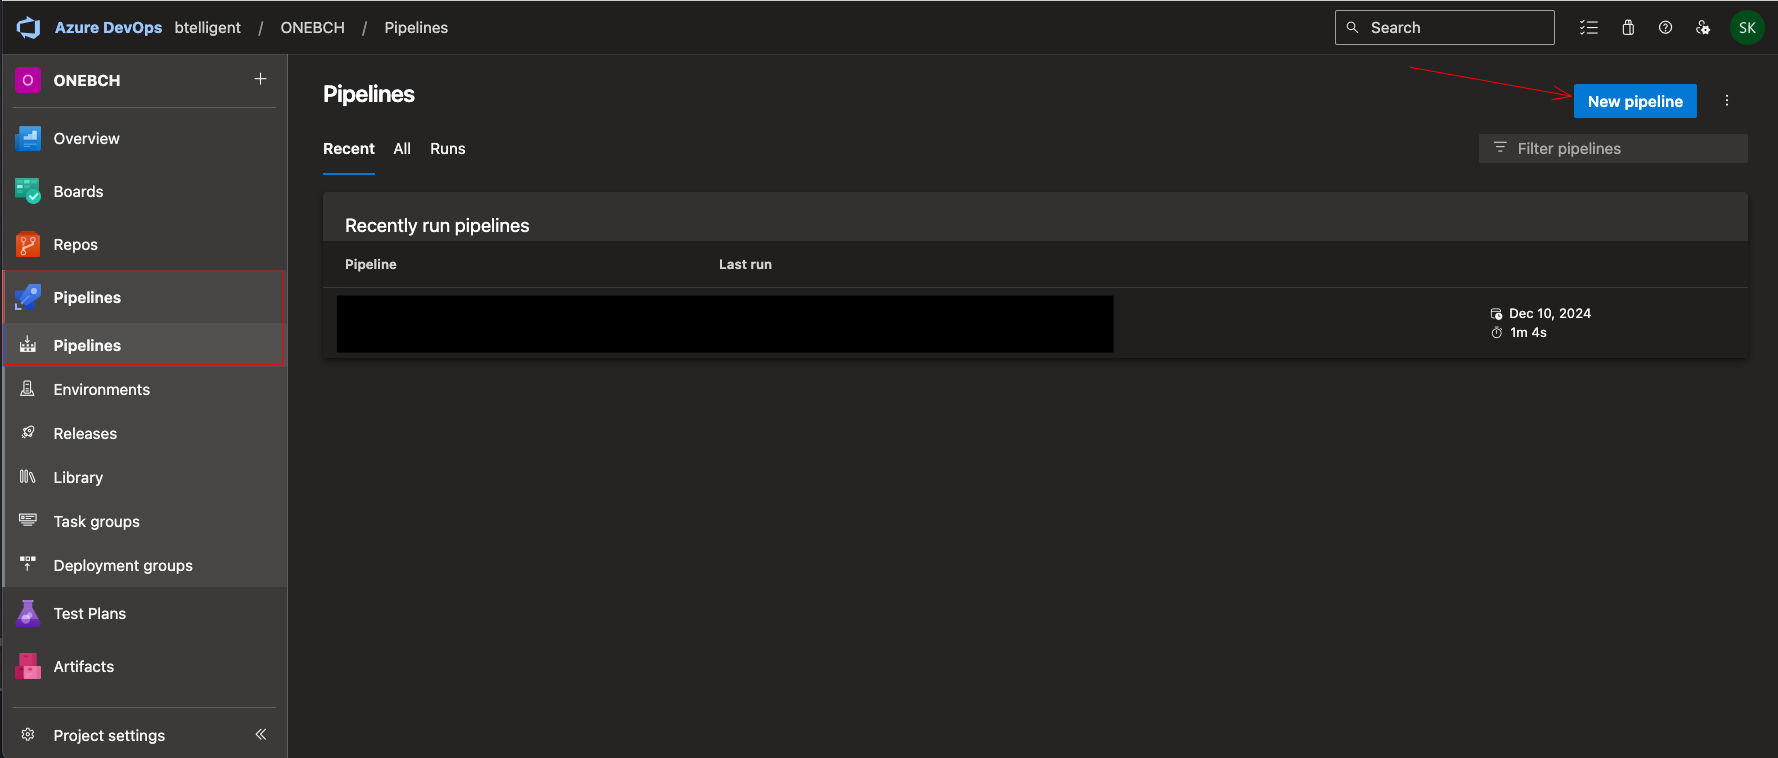
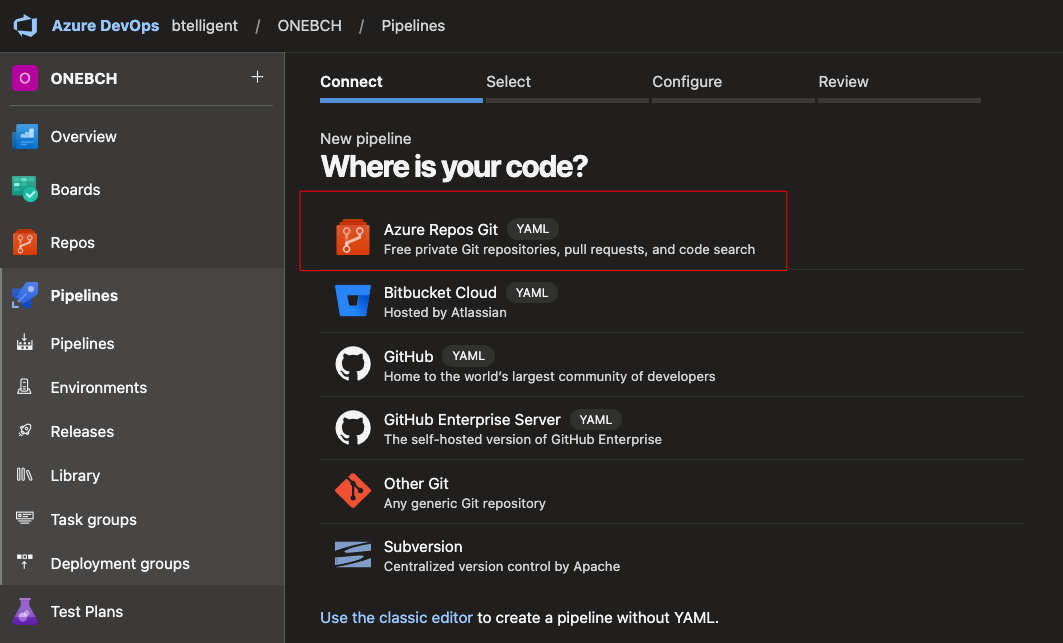
In the following dialog, I select “Azure Repos Git” as the source of the code. You can also see here that you could integrate code from other repositories.
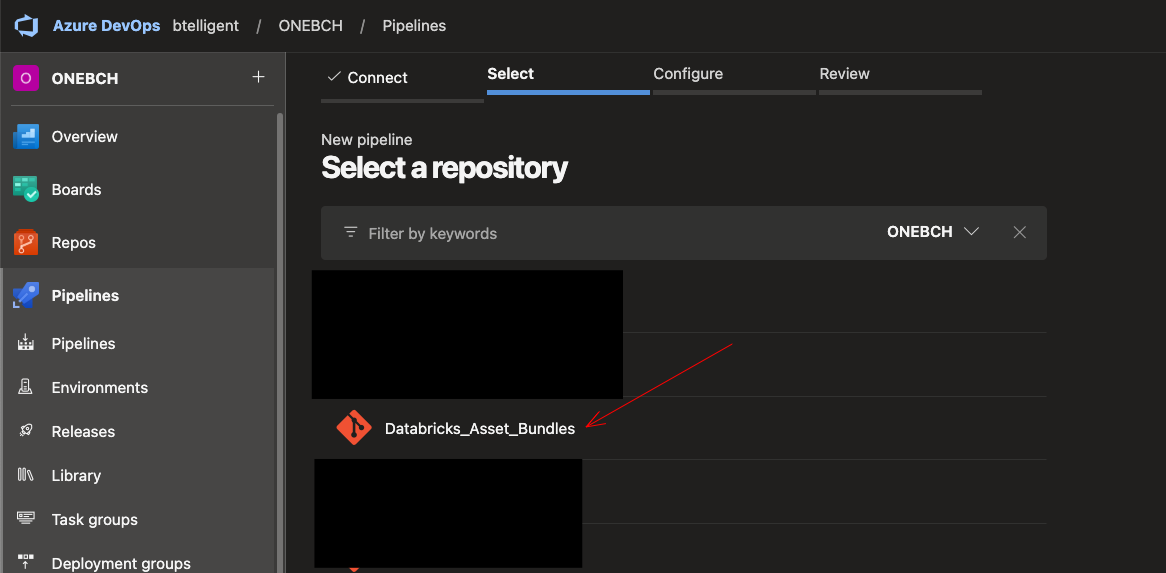
Select the appropriate repository:
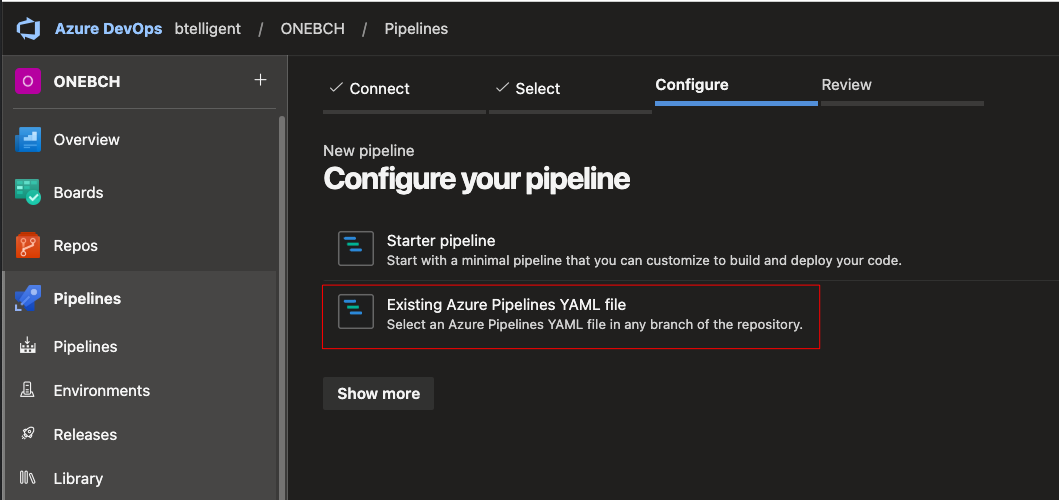
Click on the existing YAML pipeline:
And now, choose the right one:
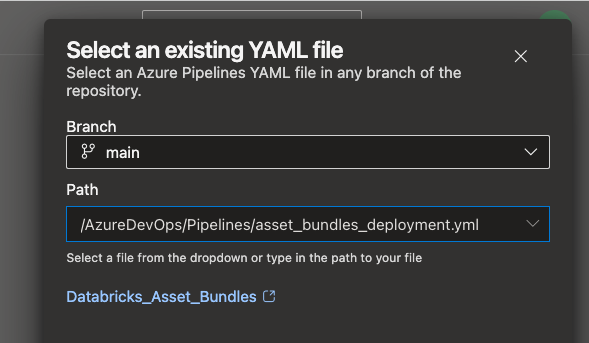
The pipeline can now be saved or executed immediately.

Next, I will start the pipeline. You can now also see the dependencies between the individual stages.
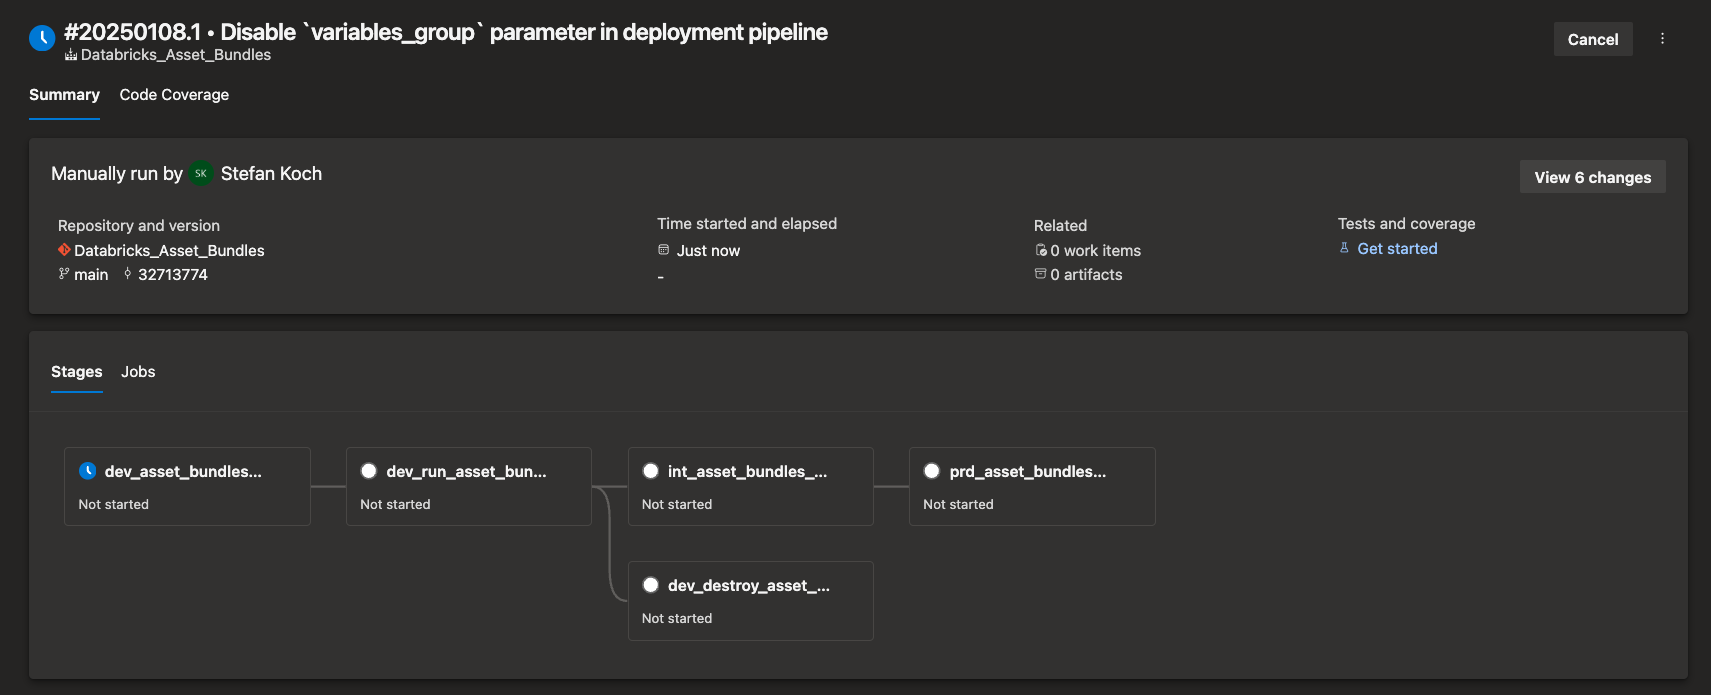
When you start the program for the first time, a message appears stating that you need to grant permission.

These can be permitted.
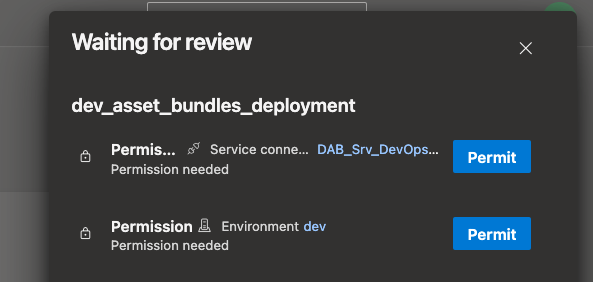
Permitting also occurs with the other stages. However, this only happens the first time the pipeline is called.
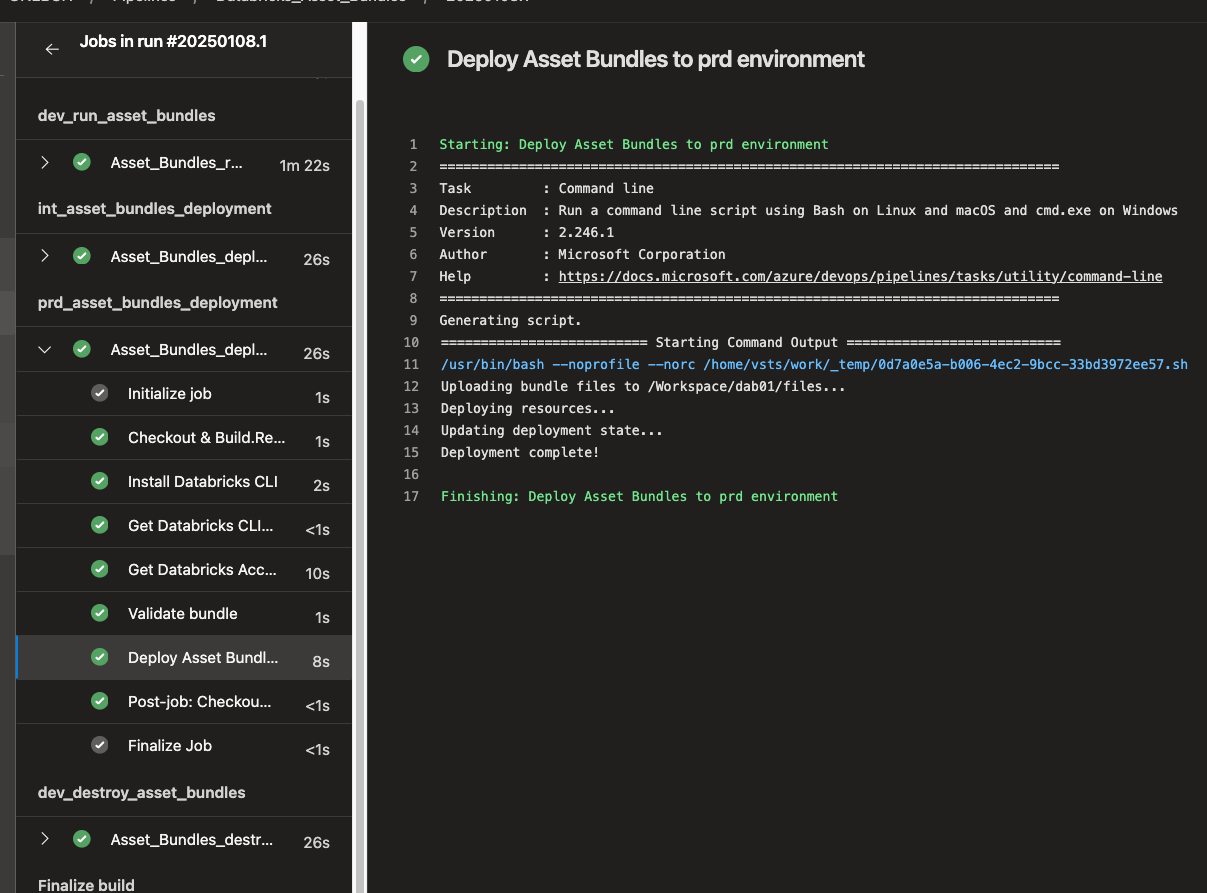
If the pipeline runs successfully, the screen should look like this:

In the run itself, you can view various information about the deployment.
I mentioned the environments earlier. When we deploy to Dev or Int, we don’t want to automatically deploy to the next stage straight away but possibly wait. Be it to run a test or for whatever reason. For this purpose, you can set “Approvals and checks” under Environments in Azure DevOps. Let’s take the example of the Prd environment:
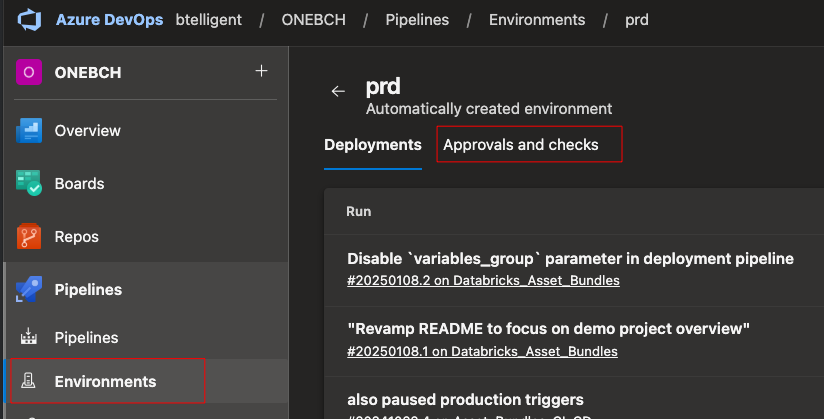
A wide range of checks are available here.

Now, let’s take a look at the Databricks production workspace.

As you can see, the jobs and notebooks were deployed directly in the desired directory in the workspace.
Conclusion
In this comprehensive guide, we walked step-by-step through setting up an Azure DevOps pipeline for Databricks asset bundle deployments. By leveraging CI/CD best practices, you can efficiently streamline the deployment of Databricks resources such as jobs, notebooks, and workflows across multiple environments (Dev, Int, Prod).
Key takeaways:
- Automation-Driven Deployment: The pipeline removes manual overhead, enabling consistent deployments through clearly defined stages.
- Environment-Specific Configuration: By using environment variables, service connections, and targeted configuration files, you maintain flexibility without resorting to hardcoding or widgets.
- Service Principals & Access Control: Using service principals ensures secure, role-based access to the Databricks workspace and avoids reliance on individual user accounts.
- Reusable Templates: The use of YAML templates minimizes redundancy and keeps the pipeline structure clean and maintainable.
- Approval Processes: Azure DevOps’ “Approvals and Checks” feature enables safe promotion between environments, ensuring that deployments to production occur only after validation.
This setup showcases how combining Databricks asset bundles with Azure DevOps pipelines results in a powerful, repeatable process for deploying data solutions. With this approach, your data platform can scale effortlessly while maintaining high-quality standards and collaboration across teams.
If you want to dive deeper or replicate this setup, the example code used in this tutorial is available in my GitHub repository. Feel free to download it and adapt it to your specific use case!
Happy automating! 🚀 Let me know if you encounter any challenges or want further customization ideas for your pipelines!
